
Project location: CanmetENERGY-Ottawa, Ottawa, ON
Timeline: 10 years (2018-2028)
Program: Funded by the NRCan Innovation Fund and Program of Energy R&D
Project Overview and Objectives
Background
This project empowers First Nations youth and communities by equipping them with the skills and resources to build, install, and maintain solar hot water systems. These systems offer a double benefit: reducing greenhouse gas emissions and lowering heating costs.
Benefits of Solar Hot Water Systems:
- Reduced Emissions: Each system offsets approximately 220 kgCO2e annually, equivalent to planting seven trees per year.
- Cost Savings: Annual savings on hot water heating can range from $200 to $600.
- Long Lifespan: Systems typically last for 25 years.
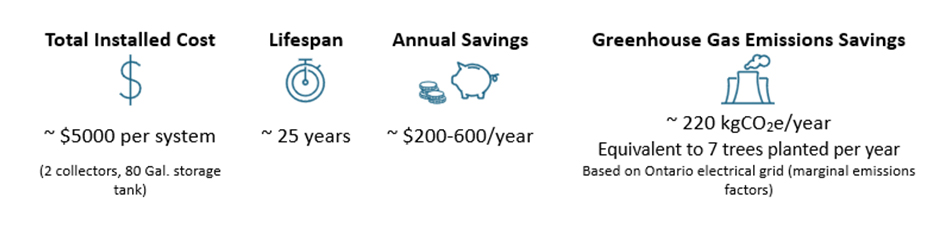
Figure 1: Benefits of Solar Hot Water Systems
Long description
Visual representation of the benefits of solar hot water systems. It depicts that the total installed cost is approximately $5000 per system (2 collectors with an 80-gallon storage tank). The lifespan would be approximately 25 years. The annual savings are between $200 and $600 per year. The greenhouse gas emissions savings are about 220 kgCO2e per year, which is the equivalent of 7 trees planted each year (based on Ontario electrical grid’s marginal emissions factors).
Project Vision (Developed with Pikangikum First Nation and Habitat for Humanity)
- Sustainability: Promote responsible resource use, aligning with the Seven Generations concept.
- Youth Development: Provide skills training in trades, empowering youth.
- Economic Opportunity: Encourage sourcing materials from Indigenous-owned businesses and potential sales of locally built solar collectors.
- Community Development: Foster collaboration and ownership by building systems for the community.
- Cost Reduction: Lower overall utility bills through solar hot water heating.
Pilot Project Success
The project successfully piloted in collaboration with the Wahkohtowin Guardians. The Guardians built two solar thermal collectors, acquiring valuable skills in woodworking, plumbing, electrical, and mechanical work (detailed fabrication steps are available in Figure 2).
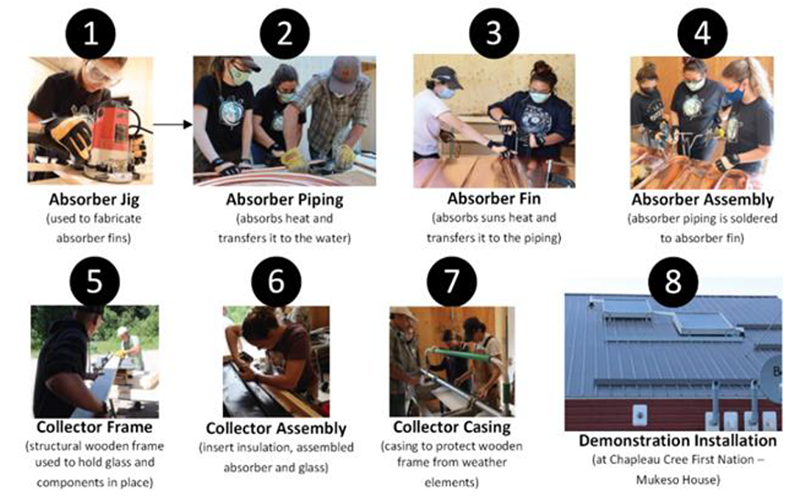
Figure 2: Solar thermal collector fabrication steps
Long description
A step-by-step photo collage showing the solar thermal collector fabrication and installation process: (Step 1) Absorber Jig – A person operates a power tool to fabricate absorber fins. (Step 2) Absorber Piping – A group works on assembling copper piping that absorbs heat and transfers it to water. (Step 3) Absorber Fin – Students attach fins that absorb solar heat and transfer it to the piping. (Step 4) Absorber Assembly – The piping is soldered to the absorber fins. (Step 5) Collector Frame – A wooden frame is built to support the collector components. (Step 6) Collector Assembly – Insulation, the absorber unit, and glass are inserted into the frame. (Step 7) Collector Casing – A metal casing is added to protect the collector from weather. (Step 8) Demonstration Installation – Completed collectors are shown installed on the roof of the Chapleau Cree First Nation’s Mukeso House.
These collectors were installed with a drainback tank and heat exchanger (Figure 3). Potable water is heated by circulating through the heat exchanger, while water in the drainback tank is heated by the collectors on sunny days. An optional monitoring system allows for remote tracking of system performance.
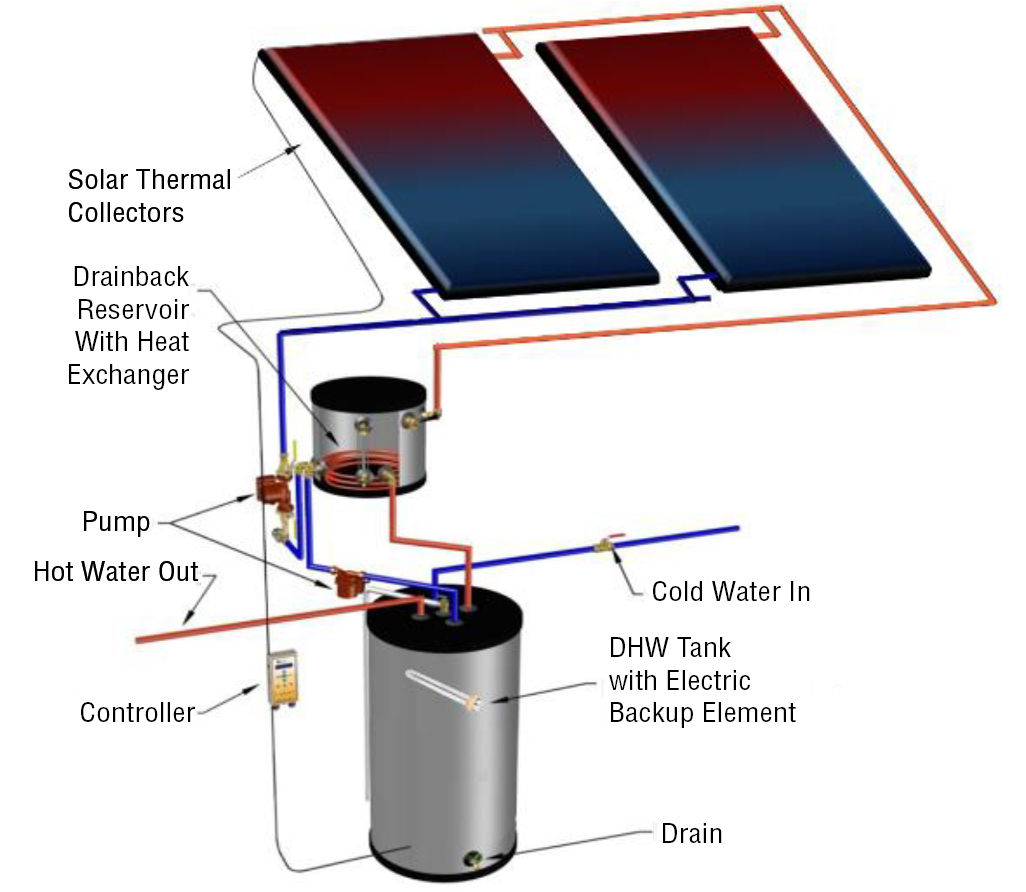
Figure 3: Exploded view of solar thermal collector
Long description
A solar water heating system using solar thermal collectors. At the top are two flat-plate solar thermal collectors connected by red (hot) and blue (cold) fluid lines. Heated fluid flows to a drainback reservoir with a heat exchanger. A pump circulates the fluid, and a controller manages the system. Heated water is transferred to a domestic hot water (DHW) tank with an electric backup element. The system includes a cold-water inlet, hot water outlet, and a drain valve.
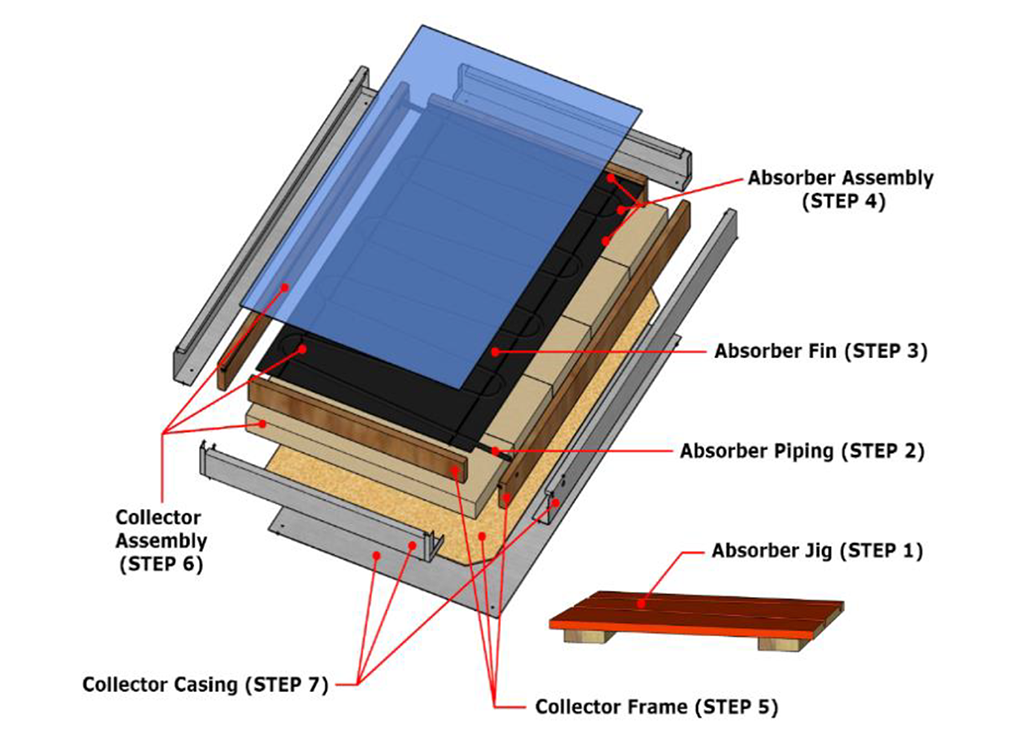
Figure 4: Solar thermal collector total installation
Long description
Exploded view diagram of a solar thermal collector showing the step-by-step assembly. From bottom to top, the labeled components are: Absorber Jig (Step 1), Absorber Piping (Step 2), Absorber Fin (Step 3), Absorber Assembly (Step 4), Collector Frame (Step 5), Collector Assembly (Step 6), and Collector Casing (Step 7). Each layer is visually separated to show how the internal structure fits together.
Installed at Chapleau Cree Mukeso House, the two collectors produced 11 kWh/day on June 16, 2024, providing enough hot water for a bath, showers, laundry, and dishes! From February 2023 to October 2023, it generated 1,193 kWh of heat.
Outcomes
This project was piloted with the Wahkohtowin Guardians, building two solar thermal collectors. The collectors were installed in Chapleau and have been offsetting energy costs for heating water for at least two years. A comprehensive guide, including videos and a materials and tool list, was created and published to allow others to build and install solar water heaters. Communities and individuals that are interested in piloting this project or learning more should reach out to: Jeremy.sager@nrcan-rncan.gc.ca.
Next Steps
The Solar Thermal Collector Fabrication guide will be available in various languages.